Resin vs PLA for Painting: 5 Steps to a Flawless Finish on Both Materials

Whether you are gearing up for your next big cosplay convention or outfitting your prized Star Wars action figure collection with screen-accurate weaponry and gear, nailing the paint job is everything. At Redflare Model Studio, we know that the secret to a jaw-dropping prop or costume accessory isn't just steady hands and premium paints, it all starts with understanding your medium.

When you dive into painting 3D printed resin vs PLA, you quickly realize these two materials play by completely different rules. Resin (SLA/DLP) offers razor-sharp details straight off the build plate, while PLA (FDM) provides rugged durability and fantastic versatility for larger pieces. But how do you prep, prime, and paint both to achieve that museum-quality, battle-scraded finish?

BTW, if you haven't explored our latest collection yet, feel free to browse our store at Redflare Model Studio Store to find incredible kits tailored for 1:6, 1:12, and 1:18 scale collectors! Let's walk through our 5-step masterclass to get a flawless finish on both resin and PLA.


1. The Prep Phase: Washing and Cleaning (Chemistry vs. Soap)

Before a single drop of paint touches your model, you have to tackle the cleaning stage. This is where resin and PLA diverge immediately.

Resin Prints

Resin parts come off the printer covered in liquid uncured resin residue. If you skip cleaning, your primer won't adhere, and your paint will eventually flake off.

  • The Process: Submerge your print in 90%–99% isopropyl alcohol (IPA) for 3 to 5 minutes. Swish it around gently, use a soft toothbrush to clear out recessed details, and ensure all tackiness is gone.
  • Post-Cure: Once completely dry, expose the resin to UV light (or sunlight) until the surface is 100% hard and dry.

PLA Prints

PLA doesn't have uncured chemical residue, but it does pick up oils from your hands and manufacturing lubricants from the print bed.

  • The Process: Keep it simple! Wash your PLA props and accessories in warm water with standard dish soap. Scrub gently, rinse thoroughly with clean water, and let them air dry completely.

2. Taming the Artifacts: Support Removal and Surface Smoothing

Painting workbench setup with miniature painting supplies and acrylic paints

Every 3D printed prop requires some clean-up after printing. How you handle this step dictates how smooth your final paint coat will look.

Resin Cleanup

Resin prints usually feature delicate support structures.

  • Use flush cutters to clip supports close to the surface rather than pulling or twisting them, which can tear chunks out of your model.
  • Use a hobby knife to carefully shave down any remaining nubs. Because resin detail is so crisp, avoid aggressive sanding on intricate textures (like character head sculpts or detailed blasters). A light scuff with 600-grit sandpaper on flat armor plates is more than enough.

PLA Cleanup

PLA prints feature visible layer lines (the hallmark of FDM printing).

  • Clip away support material and trim any stringing or blobs.
  • For PLA, sanding is your best friend. Start with 220-grit sandpaper to knock down prominent layer ridges on props and costume pieces, then work your way up to 400-grit and 800-grit for a glass-smooth surface. Take your time here, patience in sanding pays off massively when you start painting!

3. Filling Gaps and Imperfections

While resin surfaces are naturally smooth, PLA prints often require a little extra help to completely banish layer lines.

If you are working on smooth sci-fi props, control panels, or costume blasters in PLA, you will want to employ a filling agent. You can use spot putty for deep seams or apply a specialized filler primer. For resin prints, imperfections are rare, but a tiny dab of hobby putty can easily fix any accidental nick or support scar.

Need inspiration for your next technical prop build? Check out our detailed industrial accessories and greeblies over at our Redflare Model Studio Collection.


4. Priming for Perfection: The Foundation Coat

Highly detailed industrial power generator prop accessory in 1:12 scale

Never skip your primer! Primer acts as the bonding bridge between your plastic and your acrylic paints, while also revealing any hidden flaws you missed during sanding.

  • For Resin: Use a thin, detail-friendly spray primer or airbrush primer (black, grey, or white depending on your color scheme). Hold the can 10 to 12 inches away and apply light, sweeping coats. You want to preserve every micron of that gorgeous detail!
  • For PLA: Filler primer is your secret weapon here. Spray a light coat of filler primer across your PLA prop, let it cure, and you'll see those stubborn layer lines vanish. Lightly sand the dried primer with 800-grit paper if you want an ultra-glossy finish.

Please review our Assembly Instructions before diving into your build to ensure you choose the ideal primer type for your specific scale model kit.


5. Painting and Sealing Your Masterpiece

Now comes the most rewarding part: bringing your prop or costume accessory to life with color!

Whether you're painting a weathered drum blaster, intricate greeblies, or sci-fi control panels, always thin your paints.

  • Apply multiple thin layers of acrylic model paint rather than one thick coat. Thin layers preserve crisp edges, prevent pooling, and give you total control over weathering, highlights, and shadow work.
  • Sealing: Once your paint job is completely dry, lock it in with a clear protective topcoat. Choose matte for gritty, weathered battlefield gear; satin for sleek tech accessories; or gloss for glowing energy cells and screens.

Elevate Your Collection with Redflare Model Studio

Kitbash Greeblies set featuring detailed 3D printed control panels and mechanical textures

Mastering the art of painting 3D printed resin vs PLA opens up endless possibilities for customizers, cosplayers, and action figure collectors. Whether you collect in 1:6 scale (Hot Toys style), 1:12 scale (Black Series), or 1:3.75 scale (Vintage Collection), having top-tier raw materials makes all the difference.

BTW, we love rewarding our community! When you join our VIP club, you unlock exclusive deals, special bundle offers, and member-only perks. Plus, we offer free worldwide shipping on all orders over $300: we promise we'll never spam your inbox, just pure model-building goodness.

Head over to Redflare Model Studio Special Offers today to grab your next project and put these 5 painting steps into action!

Read more

Bringing Ferrix to Life: Lessons from The Art of Star Wars: Andor

If you’re anything like us, your copy of The Art of Star Wars: Andor probably arrived with a few sticky notes already poking out of the pages. When the show first aired, we were floored by the "used universe" aesthetic. It wasn't just "dirty Star Wars", it was a masterclass in industrial brutalism, layered textures, and set design that felt heavy, cold, and lived-in.

The new book from Abrams (penned by the legendary Phil Szostak) is a total goldmine for diorama builders. It pulls back the curtain on how production designer Luke Hull and his team built worlds like Ferrix and Aldhani from the ground up, favoring massive physical sets over digital volumes. For those of us spending our weekends with a 3D printer and a set of weathering brushes, this book is basically a blueprint for our next big project.

Today, we’re diving into some of the specific lessons we’ve pulled from the book and how you can use our kits, available in 1:6, 1:12, and 1:18 scales, to bring that gritty Andor vibe to your shelf.

Lesson 1: Ferrix and the Beauty of Industrial Clutter

The most striking thing about Ferrix is the density. It’s a working-class world where nothing is wasted. The book highlights how the "Brick and Mortar" aesthetic was achieved by layering pipes, scrap metal, and industrial machinery over simple, utilitarian architecture.

In your diorama, the secret to Ferrix isn't just the big buildings; it's the stuff in the corners. We’re talking about marketplace baskets, stacked crates, and tangled conduits. If you look at the concept art for the Rix Road market, it's packed with texture.

Redflare 1:12 scale marketplace diorama with baskets and droids

Pro Tip: To replicate the Ferrix look, don't just glue a panel to a wall. Layer it. Start with a flat surface, add some of our greeblie panels, and then run some real copper wire or plastic tubing over the top. It creates that sense of "retro-fitted" technology that defines the show.

Lesson 2: The Cold Elegance of the ISB (Coruscant)

On the flip side, the book shows the "elegant formalism" of Coruscant. Whether it’s Mon Mothma’s apartment or the sterile halls of the ISB, the design language is all about symmetry, clean lines, and high-contrast lighting.

When building an Imperial interior, you want your 3D prints to be flawless. This is where choosing the best paint for 3D printed models becomes critical. For these sleek environments, we recommend a high-build primer followed by fine-grit sanding to remove any trace of layer lines. A semi-gloss cool grey or an off-white lacquer will give you that "Imperial Power" finish.

A sleek, Coruscant-inspired ISB console with glowing recessed details

Integrating tech like our Imperial holo-projector or detailed wall consoles into these clean builds helps break up the flat surfaces without making them look "messy." The Art of Andor book features some incredible close-ups of the ISB workstations, notice how even the buttons have a specific, utilitarian geometry.

Detailed 1:12 scale Imperial holo-projector with Vader hologram

Lesson 3: Imperial Outposts and Strategic Defenses

Remember the heist on Aldhani? The contrast between the lush, windswept highlands and the harsh, geometric Imperial architecture is a classic Andor visual. The book goes into detail on the "fortified" look of these outposts, thick walls, heavy blast doors, and strategically placed weaponry.

If you’re building a rebel base or an Imperial garrison, our Trench Wall Set is the perfect starting point. These battle-damaged panels give you that "under siege" look instantly. Pair them with a heavy-hitter like the E-WEB Cannon to create a scene that feels like a direct still from the show.

Modular trench wall set with heavy plasma cannon for dioramas

BTW, if you’re working in 1:6 scale for your Hot Toys or 1:18 for your Vintage Collection, we’ve got you covered. Almost all our defensive kits are scaled specifically to fit those figure lines perfectly.

The Weathering Masterclass: Rust, Dust, and Oil

The Art of Andor book spends a lot of time discussing the "weathering" of the world. Even the ships have soot streaks and paint chips that tell a story of years of service. If you want your Redflare kits to look like they’ve been sitting in the Ferrix sun for a decade, you need to get comfortable with weathering paints for Star Wars props.

Quick Weathering Guide for Andor Dioramas:

  1. The Base Coat: Start with a dark metallic or primer.
  2. Chipping: Use a sponge to dab on some "chipped" metal effects on the edges of your crates or power generators.
  3. Oil Washes: A dark brown or black oil wash is the best paint for 3D printed models when you want to bring out those tiny greeblie details. Let it flow into the recesses and then wipe away the excess.
  4. Pigments: For that Ferrix "brick dust" look, use red and orange earthy pigments around the base of your structures.

Macro detail of weathered 3D printed components showing realistic wear

Ready to Start Your Build?

The Art of Star Wars: Andor is more than just a coffee table book; it’s a challenge to all of us to step up our diorama game. Whether you’re looking to recreate the bustling streets of Morlana One or a lonely Imperial outpost on a distant moon, we’ve got the parts to help you get there.

Please review our New Arrivals before ordering to see our latest 3D printed greeblies and accessories. And hey, if you hit a snag with your build or want to show off your latest project, feel free to chat to us on our socials, we love seeing what you guys create!

Oh, and a quick logistical note: we offer free worldwide shipping on all orders over $300. It’s our way of making sure you can get the parts you need, no matter where your workshop is located. We promise we won’t spam your inbox, but do consider joining our VIP club for some exclusive deals on future kits.

Happy building!


Read more

Weathering Secrets Revealed: How to Get That ‘Used Universe’ Look on Star Wars Props

Welcome back to the Redflare Model Studio, fellow builders and collectors!

If you’ve spent any time in a galaxy far, far away, you know it isn’t exactly "shiny and new." From the dusty streets of Mos Eisley to the humid swamps of Dagobah, everything in Star Wars feels lived-in. This "Used Universe" aesthetic, pioneered by George Lucas, is what makes the world feel so real, and it’s exactly what we want for our 3D printed model kits.

Whether you're working on one of our 1:6 scale cleaning droids or setting up a 1:18 scale Tatooine marketplace diorama, a flat paint job just won't cut it. You want history. You want battle damage. You want grime that looks like it’s been baking under twin suns for decades.

In this guide, we’re sharing our top weathering secrets for Star Wars props and models. We’ll show you how to take a fresh 3D print and turn it into a screen-accurate masterpiece using dry brushing, washes, and powders. Let’s dive in!

Getting Started: The Best Paint for 3D Printed Models

Before you reach for the grime, you need a solid foundation. People often ask us: what is the best paint for 3D printed models?

At Redflare, we recommend starting with a high-quality primer specifically designed for plastics or resins. Because our kits, like the Kusak or Nydak, are printed with high-resolution detail, you want a primer that won't fill in those fine textures.

  • Acrylics (Citadel/Vallejo): Great for base coating and layering. They are easy to clean and dry quickly.
  • Lacquers (Tamiya): Offer a much tougher finish, which is ideal if you’re planning on doing heavy "chipping" effects.

Pro Tip: Always apply a gloss clear coat before you start your weathering. This protects your base color and allows washes to flow into the crevices much more smoothly. Please review your paint types before ordering to ensure compatibility!

The Redflare Guide to Dry Brushing (Weapons & Droids)

Dry brushing is the bread and butter of the "Used Universe" look. It’s the fastest way to make plastic look like heavy, battle-worn metal. This is perfect for our E-WEB cannons or the edges of a Cleaning Droid.

The Technique:

  1. Take a stiff-bristled brush and dip it into a metallic paint (like silver or gunmetal).
  2. Wipe almost all of the paint off on a paper towel. Seriously: it should look like there’s nothing left.
  3. Lightly flick the brush over the raised edges of your model.

The tiny amount of paint left on the brush will catch only the highest points, creating the illusion of paint having been rubbed off to reveal the metal underneath.

A macro view of a dry-brushing technique on a 3D printed blaster prop, showing silver highlights being applied to matte black edges to simulate metallic wear.

Deep Detail with Washes (Diorama Accessories & Greeblies)

If dry brushing handles the highlights, washes handle the shadows. A "wash" is just a very thin, watery paint that naturally flows into the low spots of a model. This is how you bring out the incredible detail in our industrial power generators or marketplace baskets.

Weathering paints for Star Wars props often include "Oil Washes" or "Enamel Washes." These stay wet longer than acrylics, giving you more time to move the grime around.

  • Black Washes: Perfect for oily engine parts or deep shadows in "greeblies" (those tiny mechanical bits on ships and walls).
  • Brown/Sepia Washes: Use these for organic dirt, rust, or general "planet dust" accumulation.

Apply the wash liberally over the surface, then use a clean, damp cotton bud to wipe away the excess from the flat areas. The grime stays in the cracks, making the details pop!

Highly detailed 1:12 scale industrial power generator with modular sci-fi wall panels, showcasing realistic weathering and mechanical details in a diorama setting.

Bringing Creatures to Life with Weathering Powders

Star Wars isn't just about droids and blasters; it’s about the creatures that inhabit the worlds. From the Massiff to the mighty Ronto, these animals are usually covered in the dust of their home planets.

This is where weathering powders (or pigments) shine. They are basically crushed-up chalks that provide a hyper-realistic matte finish that paint can't replicate.

How to use them on Redflare creatures:

  1. Finish your main paint job on your Massiff or Jerba Pup.
  2. Use a soft, fluffy brush to "dust" tan or orange pigments onto the feet and lower legs of the creature.
  3. Gently blend it upward into the fur or scales.

This makes it look like the creature has actually been walking through the sands of Tatooine. BTW, if you’re building a Cantina scene, powders are also great for adding "soot" to the corners of the bar or "spilled drink" stains on the floor!

Redflare Model Studio's 3D printed Massiff and Jerba Pup creature models in a sandy diorama, featuring realistic dust weathering and rocky textures.

Scaling Your Weathering: 1:6 vs 1:12 vs 1:18

One of the best things about Redflare is that we offer our models in multiple scales to fit your specific collection. However, the way you weather a 1:6 scale character head is different from how you’d handle a tiny 1:18 scale greeblie.

  • 1:6 Scale (12"): You can go much heavier on the detail here. Individual scratches, oil streaks, and even tiny rust spots are visible. Use fine-tipped brushes and real metallic flakes.
  • 1:12 Scale (6"): This is the "sweet spot" for Black Series collectors. Focus on high-contrast weathering. Make the shadows darker and the highlights brighter so the detail stands out on your shelf.
  • 1:18 Scale (3.75"): Less is more. If you over-weather a tiny 1:18 scale Ronto, it will just look like a messy blob. Stick to a single thin wash and very light dry brushing.

The C1G heavy plasma cannon diorama set, featuring Hoth Rebel Troopers and modular trench walls, demonstrating large-scale weathering for Hoth-themed displays.

Pro Tip: The Final Seal

Once you’ve spent hours getting your Bograt or Kusak looking perfectly filthy, you need to lock it in. Weathering powders, in particular, will rub right off if you touch them.

Use a Matte Clear Coat to seal the model. This removes any unnatural plastic shine and gives the whole piece a unified, professional look. We always say: the difference between a "toy" and a "model" is the finish!

Join the Redflare Creative Community

We love seeing what you guys create with our kits. There is nothing more satisfying for us than seeing a "clean" 3D print leave our shop and turn into a battle-scarred relic in your hands.

If you want to stay up to date with our latest releases: like new droids, creatures, and diorama accessories: make sure to join our VIP Club! You’ll get exclusive deals and be the first to know when we drop new screen-accurate designs. (And don't worry, we promise not to spam your inbox!).

Sign up for the Redflare VIP Club here!

Happy building, and may the Force (and a good wash) be with your models!


Read more

Citadel vs Vallejo: Which Is Better For Your Star Wars Kits?

So, you’ve just unboxed a fresh delivery from Redflare. Maybe it’s our massive Ronto for your Tatooine diorama, or perhaps a crisp 1:6 scale head sculpt for your latest custom project. The detail is sharp, the supports are off, and it’s time for the most exciting (and sometimes most stressful) part: the paint job.

If you’ve spent any time in the hobby world, you know the two titans of the industry: Citadel and Vallejo. For us Star Wars collectors and diorama builders, choosing the right paint isn't just about color, it's about how the pigment bites into 3D printed resin, how it handles the "Used Universe" weathering, and how it scales across 1:6, 1:12, and 1:18 scale figures.

We’ve spent countless hours in the Redflare studio testing both on everything from Massiffs to Droids, and we’ve got some thoughts. Let’s dive into the great Citadel vs. Vallejo debate and see which one deserves a spot on your workbench.

First: The 3D Print Factor (Resin vs. PLA)

Before we talk brands, we need to talk surfaces. At Redflare, we specialize in high-quality 3D prints. Most of our character heads and smaller accessories are printed in high-detail resin, while some larger terrain pieces or structural components might be PLA.

Both Citadel and Vallejo are water-based acrylics, which is exactly what you want for 3D printed models. They won't eat into the resin like some harsh enamels can. However, priming is non-negotiable. Resin is naturally quite smooth, and paint needs something to "grab" onto.

  • For Resin: Use a dedicated plastic primer. Citadel’s spray primers (like Chaos Black or Grey Seer) are legendary for their tooth, but they are pricey. Vallejo Surface Primer (available in bottles for airbrushing or brush-on) is fantastic for preserving the fine details on our head sculpts.
  • For PLA: You’ll likely be dealing with minor layer lines. Here, a filler-primer is your best friend before you even touch your hobby paints.

Highly detailed Ronto model kit by Redflare

Citadel: The King of Coverage and Convenience

Citadel (by Games Workshop) is the paint brand most of us started with. They have a massive presence, and their system is designed to be "foolproof."

The Pros for Star Wars Builders

  1. Contrast Paints: This is Citadel’s secret weapon. If you’re painting a Massiff or a Loth Cat, Contrast paints flow into the fur textures and provide an instant basecoat and shade in one go. It’s a huge time-saver for organic creatures.
  2. High Pigment Density: Citadel "Base" paints cover like a dream. If you’re painting the dark, matte grey of an Imperial corridor or a C1G Plasma Cannon, one or two thin coats usually do the trick.
  3. The "Shade" Range: Agrax Earthshade and Nuln Oil are often called "liquid talent." For Star Wars weathering, Agrax is perfect for that Tatooine "grime" on boots and droids.

The Cons

  • The Pots: We’ve all been there. The flip-top pots are notorious for drying out if the rim gets messy. Plus, it’s harder to control exactly how much paint you’re using.
  • Price: Per milliliter, Citadel is one of the more expensive hobby paints on the market.

Vallejo: The Precision Choice for Realism

Vallejo is the choice for many professional diorama builders and "pro-painters." They lean more towards a realistic, historical military palette, which, coincidentally, is exactly how the original Star Wars props were designed.

The Pros for Star Wars Builders

  1. The Dropper Bottles: This is a game-changer. You can squeeze out exactly one drop at a time onto your palette. It keeps the paint fresh for years and makes mixing custom colors (like that specific "Imperial Grey") much easier.
  2. The Model Color vs. Game Color Ranges: Model Color is designed for realism, perfect for the muted tones of the Rebellion or the dusty streets of Mos Eisley. Game Color is more vibrant, great for lightsabers or colorful droids.
  3. Airbrush Friendly: If you’re painting a large-scale piece like our Ronto or a Hoth Trench Wall, Vallejo’s Model Air range is pre-thinned and ready to go. It’s much less of a headache than thinning Citadel paints for a 1:6 scale project.

The Cons

  • Consistency: Vallejo can be a bit thinner than Citadel. You might need three coats where Citadel would need two.
  • Complexity: With so many ranges (Model Color, Game Color, Mecha Color, Panzer Aces), it can be overwhelming for a beginner to know which grey to buy.

C1G Hoth Cannon diorama set with modular walls

Scale Matters: 1:6 vs 1:18

One of the things we love at Redflare is seeing how you guys customize different scales.

  • 1:18 Scale (3.75"): These are tiny. You need paint that won't obscure the details. Vallejo is great here because it can be thinned very heavily while maintaining its pigment.
  • 1:6 Scale (12"): These are huge! You’ll be using a lot of paint. Vallejo’s price point and airbrush-ready bottles make it the pragmatic choice for large surfaces like robes, armor plates, or industrial power generators.

BTW, if you’re working on a 1:12 scale (6") Black Series-style diorama, you’re in the "sweet spot" where both brands work equally well. We often use Citadel for the skin tones on our head sculpts and Vallejo for the accessories.

Old Jedi Master head sculpt in high detail

The Redflare Verdict: The "Mixed Palette" Strategy

So, which is better? Honestly, we don't think you should choose just one. Our studio workbench is a messy mix of both.

Use Citadel For:

  • Organic Textures: Use Contrast and Shades for creatures like the Narglatch or Galoomp.
  • Quick Basecoating: When you need a solid color fast.
  • Metallics: Citadel’s "Leadbelcher" and "Retributor Armour" are some of the best-behaving metallics in the hobby.

Use Vallejo For:

  • The "Used Universe" Look: Their vast range of military greys, tans, and browns is perfect for that lived-in Star Wars aesthetic.
  • Airbrushing: Essential for large-scale droids and diorama walls.
  • Detailed Mixing: When you need to match a specific screen-accurate color perfectly.

Pro Tip for Redflare Kits

When painting our 3D printed resin, always start with a very thin wash of your base color. This helps you see the details without filling them in. If you're painting our Massiff and Jerba Pup set, try a Vallejo Khaki basecoat followed by an Agrax Earthshade (Citadel) wash. The result? Perfection.

3D printed Massiff and Jerba Pup models in a diorama

Ready to Start Your Next Project?

Whether you're a Citadel devotee or a Vallejo veteran, the most important thing is having a high-quality "canvas" to work on. Check out our Full Store to see the latest 3D printed creatures, droids, and accessories.

P.S. Want to save some credits for your paint budget? Join the Redflare VIP Club for exclusive deals, and remember, we offer free worldwide shipping on orders over $300!

Please review your current collection and see what’s missing: maybe it’s time to add a Steelpecker or a Bograt to your shelves.

Happy painting, and may the Force (and the primer) be with you!

Read more

Acrylic vs Lacquer: The Simple Trick to Improve Your Model Kit Finish Right Now

We’ve all been there. You spend days (or weeks) perfecting a 3D print. You’ve sanded the resin until it’s smooth as glass, or you've carefully prepared a 1:6 scale droid kit. You reach for your trusty acrylics, start painting, and… it looks okay. But it doesn't look factory. It doesn't have that deep, "used universe" durability you see on professional studio models.

If you’ve been wondering why your finishes aren't quite hitting the mark, the answer usually boils down to a classic hobbyist debate: Acrylic vs Lacquer.

At Redflare Model Studio, we’ve seen thousands of builders tackle our 3D printed model kits, from the tiny scurriers in 1:18 scale to massive 1:6 scale character builds. Through years of testing, we’ve found a "simple trick" that bridges the gap between these two paint types. It’s the secret to getting a finish that is both incredibly durable and hyper-detailed.

Let’s dive into the world of model paints and see how you can level up your next build.

The Contenders: Acrylic vs Lacquer for Model Kits

Before we get to the "trick," we need to understand the tools. If you’re looking for the best paint for 3D printed models, you’ll mostly be choosing between these two.

Acrylic Paints: The Community Favorite

Most of us start with acrylics (like Citadel, Vallejo, or Army Painter). They are water-based, low-odor, and incredibly easy to clean up.

  • Pros: Safe to use indoors, huge color range, and they dry fast. They’re perfect for brush painting fine details on things like our Massiff models or character head sculpts.
  • Cons: They don't "bite" into the resin or plastic very well. Acrylics sit on top of the surface, making them prone to scratching or peeling if the piece is handled frequently.

Lacquer Paints: The Professional Standard

Lacquers (like Tamiya LP or Mr. Color) are solvent-based. They are "hotter" than acrylics, meaning the chemicals actually melt slightly into the surface of the model.

  • Pros: Incredibly tough finish. They level out beautifully, leaving a thin, smooth coat that doesn't obscure the tiny details on a 1:12 scale droid unit.
  • Cons: They smell! You absolutely need a respirator and good ventilation. They are also much harder to use with a traditional brush; they are designed almost exclusively for airbrushing.

A highly detailed Star Wars Tatooine marketplace diorama featuring a Massiff creature and various accessories, showcasing a professional painted finish.

The Simple Trick: The "Paint Sandwich"

Here is the secret used by pro-builders and studio artists: You don't have to choose one or the other.

The best way to improve your finish right now is to use Lacquer for your base, and Acrylic for your details.

Why this works

Lacquer is the "hottest" paint, and Acrylic is the "coolest." In the world of model kits, there’s an unspoken law: Never put a hot paint over a cool one. If you spray lacquer over acrylic, the solvent in the lacquer will eat the acrylic layer and ruin your work.

However, if you do the opposite, putting Acrylic over Lacquer, you get the best of both worlds. The lacquer base coat provides a rock-solid, smooth foundation that won't budge. You can then use acrylics for all your weathering, washes, and fine detailing.

The "Simple Trick" Workflow:

  1. Prime with Lacquer: Use a high-quality lacquer-based primer. It will fill micro-pores in the 3D resin and create a bond that won't chip.
  2. Base Coat with Lacquer: Spray your main color (like the grey of a Steelpecker) using lacquer paint.
  3. Weather with Acrylic: This is the fun part. Because the lacquer base is so tough, you can apply acrylic washes or "chipping" effects. If you make a mistake? You can wipe the wet acrylic off with a damp cloth without affecting the lacquer base coat underneath.

This gives you a level of control that you just can't get using acrylics alone.

Why 3D Printed Resin Needs Extra Care

If you’re building kits from our shop, you know we specialize in high-detail resin prints. Whether it's a Kusak or a Nydak, 3D resin is much denser and smoother than traditional injection-molded plastic.

Because resin doesn't have the same "porosity" as plastic, paint adhesion is the number one struggle for customizers. Using the lacquer base method ensures that your paint doesn't just flake off the first time you try to pose your figure or move your diorama.

Scale Matters: 1:6 vs 1:18

The scale of your model also changes how you should approach your finish:

  • 1:18 Scale (3.75"): These are tiny! Every layer of paint counts. Lacquers are thinner than acrylics, so using a lacquer base prevents you from "clogging" the details on small creatures like Scurriers.
  • 1:12 Scale (6"): This is the sweet spot for the "Sandwich" trick. Most Black Series or Vintage Collection customizers use this method to ensure their droids look screen-accurate.
  • 1:6 Scale (12"): For larger builds, like our Ronto, a lacquer base is essential for durability. A large model has more surface area to get scratched, don't risk it with a weak paint job!

A detailed 3D printed lizard creature model showing the precision and fine surface detail that can be achieved with proper painting techniques.

Step-by-Step: Getting the Pro Finish

Ready to try it? Here is our recommended workflow for any Redflare kit.

1. Prep is Paramount

Before a drop of paint touches the resin, you need to prep. Even the best lacquer won't stick to uncured resin or dust.

  • Check our Assembly Instructions for tips on cleaning and sanding.
  • Wash the kit in warm soapy water to remove any lingering resin oils.
  • Dry it thoroughly. (Seriously, wait an extra hour. Moisture is the enemy.)

2. The Lacquer Foundation

Set up your airbrush (or use a high-quality rattle can like Tamiya Fine Surface Primer). Apply 2-3 thin coats. You want to see the "sheen" of the resin disappear, replaced by a smooth, uniform matte or satin finish.

3. The Acrylic Magic

Once your lacquer base is dry (usually within 30 minutes), you can switch to your acrylics. This is where you bring the model to life.

  • Dry Brushing: Pick out the scales on a Bograt or the fur on a Wyyyschokk.
  • Washes: Mix a dark acrylic wash and let it settle into the recesses. Since your base is lacquer, you can use a cotton bud to "clean" the highlights without stripping the base paint.

4. Sealing the Deal

To finish, we always recommend a final clear coat. A matte lacquer clear coat will unify the different textures of the acrylic and lacquer layers, making the whole thing look like a single, solid object.

A highly detailed 3D printed Hoth-themed diorama with a heavy plasma cannon, showcasing realistic weathering and textural variety.

A Quick Safety Note

We love this hobby, and we want you to stay healthy doing it! Lacquers contain strong solvents. Please, please review your safety gear before ordering your first batch of lacquer paints.

  • Respirator: A simple dust mask isn't enough. You need one rated for organic vapors.
  • Ventilation: If you don't have a spray booth, work outdoors or near a very large open window with a fan.
  • BTW: If you're painting in a shared living space with no ventilation, stick to high-quality acrylic primers instead. Safety first!

Summary: Which is the Best Paint for 3D Printed Models?

The truth is, neither is "the best" on its own. The real winner is the combination.

By using Lacquer for durability and Acrylic for detail, you’ll find that your painting sessions become less frustrating and more creative. You’ll stop worrying about the paint chipping and start focusing on making your Star Wars dioramas look as realistic as possible.

We’re always excited to see what the community builds! If you’ve used this trick on one of our kits, head over to our social pages and show us. And don't forget, if you’re planning a massive project, we offer free worldwide shipping on orders over $300: perfect for stocking up on droids and creatures for your next masterpiece.

Happy building!


Read more

1,500 5-Star ***** Moments : Why Collectors Love Redflare on Etsy

We’ve just hit a milestone that has the whole team here at Redflare Model Studio absolutely buzzing. As of this week, our Etsy shop has officially surpassed 1,500 reviews, maintaining a stellar 4.9-star rating.

For a small studio dedicated to the niche, dusty corners of the galaxy, that’s not just a number, it’s 1,500 moments where we’ve helped a collector finish a project, a customizer find that "impossible" part, or a diorama builder bring a scene to life. We wanted to take a second to say a massive thank you to everyone who has supported us, left a review, or shared a photo of their finished build. You’re the reason we keep the printers running 24/7!

In this post, we’re diving into why the community has been so vocal about their love for Redflare and highlighting some of the fan-favorite items that keep landing those 5-star badges.

The Power of 4.9 Stars: Trust in the Hobby

In the world of 3D printing and high-end collectibles, trust is everything. We know that when you’re ordering a custom head sculpt or a large creature for your 1:6 scale display, you’re looking for more than just "a piece of plastic." You’re looking for screen accuracy, tactile quality, and a product that won't require hours of sanding before you can even touch it with a brush.

Maintaining a 4.9-star rating across 1,500 reviews is something we take very seriously. It means that when you open a Redflare box, the "wow" factor is there. Whether it’s the crispness of our resin prints or the way our accessories fit perfectly with your Hasbro Black Series or Hot Toys figures, we strive for consistency.

BTW, if you’ve ever been burned by brittle or low-detail prints elsewhere, we hear you. That’s why we use premium resins and constant quality checks. As one of our recent Etsy buyers put it, the models are "absolutely stunning", and that’s the standard we aim for every single time.

Quality You Can Feel (and Scale)

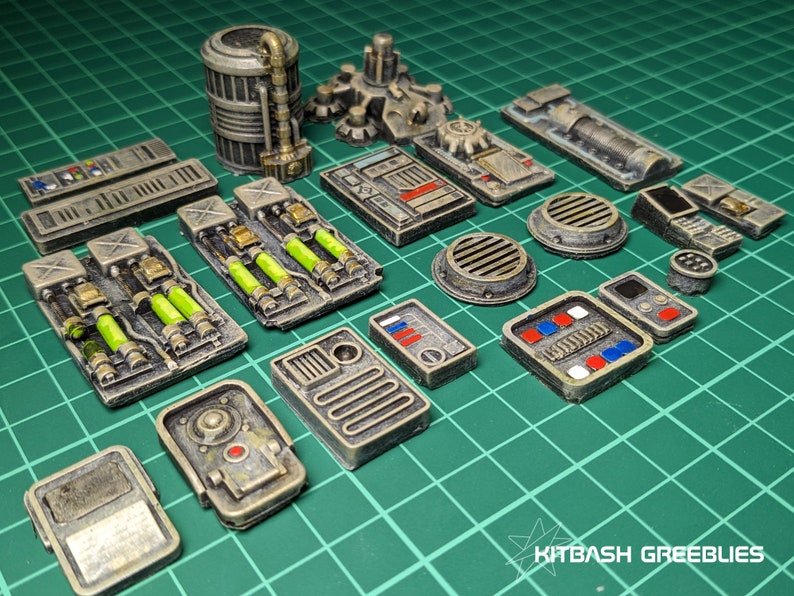
One of the most common pieces of feedback we get is about our versatility in scaling. We know that Star Wars collectors don’t all play in the same sandbox. Some are die-hard 3.75" (1:18) Vintage Collection fans, while others are all about the 6" (1:12) Black Series or the museum-grade 12" (1:6) figures.20 GreebliesTake our 20 Greeblies kit, for example. Nearly 200 sets of these have been sold, and it’s easy to see why. For kitbashers, customizers, and diorama builders, these little detail pieces are essential for turning a flat surface into something that feels properly Star Wars. With over 29,000 visits to this product alone – it surpassed our wildest expectations from such an innocuous item.
Because we offer our parts in multiple scales, these greeblies work brilliantly whether you’re building for 3.75", 6", or 12" displays. Our commitment to multiple scales is a direct response to what you told us you needed. We’re collectors too, and there’s nothing more frustrating than finding the perfect accessory only to realize it’s the wrong size for your shelf. At Redflare, we’ve made it our mission to bridge that gap.

Building Your Dream Diorama

If there’s one thing that unites the Redflare community, it’s the love for world-building. Most of our customers aren’t just looking for a single figure; they’re looking to build a "Used Universe."

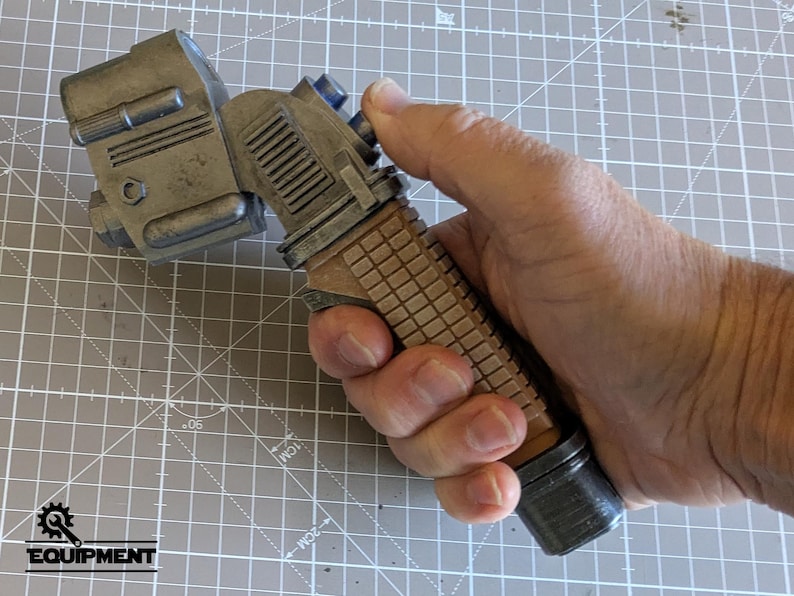
Our Plasma Welder tool prop has become a standout favourite for a different kind of builder. Launched in October 2025, it has already pulled in over 3,000 visits and has become incredibly popular with cosplayers looking for a screen-accurate sci-fi tool that feels right in the hand and looks the part on a finished costume.Plasma Welder MK3We love seeing how customers use props like this to finish off a costume, upgrade a display, or add a bit of practical world-building to a scene. It’s that mix of accuracy, texture, and usability that keeps people coming back, and when a product lands this well with the cosplay crowd, that’s a huge win for us.
It’s All in the Details: Head Sculpts and Accessories

Sometimes, a project just needs that one specific thing to make it pop. Maybe it’s a specific character’s expression or a piece of gear that the big toy companies missed. That’s where our character Head Sculpts come in.

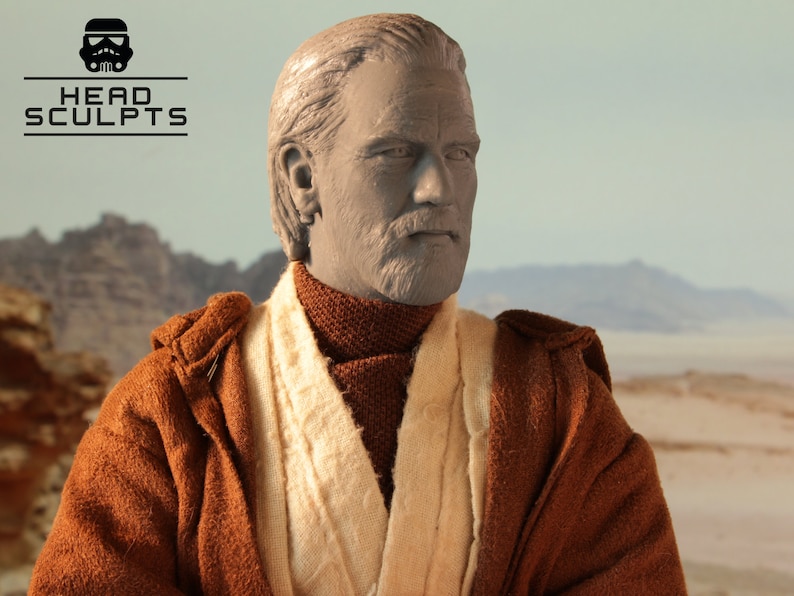
Our head sculpts, like the weathered Imperial disguise versions or the iconic Cantina band members or Obiwan Kenobi (Both "old Ben" and young Kenobi), are designed with a focus on character and "soul." We use high-resolution 3D sculpting to ensure that every wrinkle, scar, and expression is captured.Obiwan Kenobi Head SculptCustomisers love these because they provide a blank canvas for high-end painting. If you're looking to upgrade a standard figure into something truly unique, checking out our latest head sculpts is the best place to start. The feedback on Etsy often mentions how these sculpts "transform" a shelf-bought figure into a custom masterpiece.

From Our Studio to Your Door, Fast

We know the feeling: you’ve got a free weekend, your paints are ready, and you just need that last part to arrive. Waiting weeks for shipping is the worst. That’s why we’ve worked hard to streamline our logistics.

While some 3D printing shops can take weeks just to get a print started, we pride ourselves on getting orders out the door quickly. Even with our worldwide shipping (which is free on most Etsy orders, by the way!), we aim to get your items into your hands while the creative spark is still fresh.A high-resolution photograph of a professional shipping and packaging station, showing care and precision in preparing customer orders.Please review our shipping estimates before ordering, but know that we’re doing everything we can to minimize the "transit time" between our printers and your workbench. The reviews on Etsy frequently mention "lightning-fast delivery" and "expert packaging": we treat every package like it’s a delicate piece of the Death Star plans.

Why We Do What We Do

At the end of the day, Redflare Model Studio is about the community. We started this because we wanted these items for our own collections, and we’re so grateful that so many of you feel the same way.

Whether you're a pro painter who has been in the hobby for decades or someone who just bought their first 3D printed kit, we want to make sure you have the tools to succeed. If you ever have a question about how to paint our resin or which scale is best for your specific project, don’t hesitate to reach out to us. We love chatting with fellow builders!

Join the Redflare Inner Circle

Want to be the first to know about new drops, exclusive deals, and VIP-only items? We’d love to have you in our club. We promise not to spam you: just the good stuff, straight to your inbox.

Thank you again for 1,500 amazing reviews. Here’s to the next 1,500 and many more dioramas to come!

Happy building,

The Redflare Team

Read more

The Ultimate Guide to the Best Paint for 3D Printed Models: Everything You Need to Succeed

You’ve spent hours (maybe days!) dialing in your printer settings, waiting for that perfect print to finish, and carefully removing supports. You’re holding a screen-accurate 3D printed kit in your hands, and it looks incredible. But now comes the part that can feel a little daunting: painting it.

We get it. Whether you’re building a massive diorama for your Black Series collection or customizing a 1:6 scale head sculpt, the paint job is what brings the "Used Universe" to life. At Redflare Model Studio, we’re obsessed with that lived-in, grimy, Star Wars-inspired aesthetic. But to get there, you need the right tools and the right knowledge.

In this guide, we’re breaking down everything we’ve learned about the best paints for 3D printed models, from the resin vs. PLA debate to the eternal Citadel vs. Vallejo showdown. Let’s get stuck in.

Step 1: Material Matters – Resin vs. PLA Prep

Before you even crack open a bottle of paint, you need to understand the surface you’re working on. Adhesion is the name of the game here.

Resin Models (SLA/DLP)

Most of our high-detail kits, like our creature head sculpts or the Kusak model kit, are printed in resin. Resin is fantastic for detail, but it can be picky about paint if not prepped correctly.

  • Cleanliness is key: Always ensure your resin prints are fully cured and washed in isopropyl alcohol (IPA). Any leftover resin or skin oils will prevent paint from sticking.
  • Light Sanding: We recommend a very light sand with high-grit sandpaper (400-600 grit) on larger surfaces to give the primer something to "bite" into.
  • The Prime Directive: Never skip the primer. A high-quality plastic-safe spray primer is essential.

PLA Models (FDM)

If you’re working on larger diorama pieces like trench walls or crates, you might be handling PLA.

  • Layer Lines: The main challenge with PLA is those pesky layer lines. You’ll want to use a "filler primer" and sand it back to get a smooth, screen-accurate finish.
  • Heat Sensitivity: Be careful if you use a hair dryer to speed up paint drying, PLA can warp if it gets too hot!

An unpainted resin head sculpt showing the fine details and clean surface preparation needed before painting.

Step 2: The Paint Choice – Acrylics vs. Lacquers

This is where the community usually splits into two camps. Here is our take on which one you should choose for your hobby desk.

Water-Based Acrylics (The Gold Standard)

For 90% of your work, water-based acrylics are the way to go. They are low-odor, easy to thin with water, and incredibly forgiving. If you make a mistake, you can usually wipe it off before it sets. Brands like Citadel and Vallejo fall into this category.

Lacquers and Enamels

Lacquers are much "hotter" (chemically aggressive) and provide a rock-solid finish. They are brilliant for basecoating if you use an airbrush, as they dry almost instantly and are very durable.

Pro Tip: Please review the safety instructions for lacquers before ordering. They have strong fumes, so you’ll need a mask and a well-ventilated space. We generally stick to acrylics for detail work and lacquers for heavy-duty priming or specific metallic finishes.

Step 3: The Great Debate – Citadel vs. Vallejo

If you’ve walked into a hobby shop recently, you’ve seen the rows of pots and bottles. Which one is better for your Star Wars kits?

Citadel (Games Workshop)

We love Citadel for their washes and technical paints. Their "Nuln Oil" and "Agrax Earthshade" are basically "liquid talent" for adding depth to droids and greeblies.

  • Pros: Incredible coverage, fantastic washes, and "Technical" paints for effects like rust or slime.
  • Cons: The "pot" design can lead to paint drying out, and they are generally more expensive per ml.

Vallejo (Model Color & Model Air)

For that "Used Universe" look, Vallejo is often our go-to. Their Model Color range has a massive selection of desaturated, realistic military greys, tans, and olives that feel right at home in a galaxy far, far away.

  • Pros: Dropper bottles make mixing easy and keep paint fresh. Their "Model Air" line is pre-thinned for airbrushes, which is a massive time-saver.
  • Cons: Some colors require a bit more shaking to get the pigment mixed properly.

Our Verdict: We use a mix! Vallejo for the base colors and airbrushing, and Citadel for the specific "magic" washes and technical details.

A set of 3D-printed sci-fi greeblie panels, perfect for testing different paint and weathering techniques.

Step 4: Nailing the "Used Universe" Look

Star Wars isn't clean. Everything is oily, dusty, and has seen better days. To get that authentic look on your Redflare kits, you need to master weathering.

  1. Base Coating: Start with your main color (e.g., an off-white for a stormtrooper or a dull grey for a droid).
  2. The Wash: Apply a dark brown or black wash into the recesses. This instantly makes the mechanical details pop.
  3. Chipping: Take a small piece of sponge, dip it in a dark metallic or dark grey paint, dab most of it off on a paper towel, and lightly "stipple" the edges of your model. This mimics paint chipping off to reveal the metal underneath.
  4. Streaking: Use a thin brush to pull "grime" down from bolts or panels. This looks like oil or rainwater has been running down the surface for years.

BTW, if you're looking for inspiration on how a finished weathered piece should look, check out our weathered Sandtrooper backpack: it’s a masterclass in realistic grime.

A close-up of a weathered 3D printed backpack accessory, showing realistic chipping and grime.

Technical Summary for Success

  • For Resin: Wash, Cure, Prime, Paint (Acrylics).
  • For PLA: Sand, Filler Primer, Sand again, Paint.
  • For the "Used Universe": Focus on desaturated colors (Vallejo) and heavy weathering (Citadel washes).

Painting is a journey, and every model you finish makes you a better maker. If you're just starting, don't be afraid to experiment on some smaller greeblies before tackling a major project like a full droid or creature.

If you ever get stuck, we’ve got assembly instructions for many of our kits to help you along the way. And don't forget: we offer free worldwide shipping on orders over $300, so it’s the perfect excuse to stock up on multiple scales!

Happy painting, everyone! We can’t wait to see what you create. If you want to stay in the loop with our latest releases and get exclusive deals, make sure to join our VIP club. We promise not to spam your inbox: only the good stuff.

A hand-painted 3D printed model kit of a four-eyed lizard creature, showing how paint can bring a character to life.

Read more

Mastering the ‘Used Universe’: A Guide to Weathering Powders, Inks, and Household Hacks for Star Wars Props

Let’s be honest: in the Star Wars galaxy, nothing looks like it just rolled off the factory floor. From the gritty streets of Jedha to the mud-soaked trenches of Mimban, everything has a story told through grime, rust, and scuffs. George Lucas famously called this the "Used Universe," and for us collectors and diorama builders at Redflare Model Studio, it’s the holy grail of finishing a project.

Whether you’re working on one of our 1:12 scale Massiff creatures or a custom Cassian head sculpt, the difference between a "toy" and a "prop" is all in the weathering. Today, we’re diving into the toolkit you need to make your models look like they’ve seen a few galactic skirmishes. We'll cover the big brands, the "liquid talent" washes, and some surprisingly effective household hacks that’ll save you a few credits.

1. The Pro’s Palette: Weathering Powders and Pigments

If you want that dusty, sandy look of a Tatooine marketplace, you can’t beat dedicated weathering powders. These are essentially finely ground pigments that you "scrub" into the recesses of your model to simulate environmental buildup.

Tamiya Weathering Master

These are the gold standard for beginners. They look like little makeup compacts and even come with a double-ended sponge applicator.

  • The Go-To: Set A (Sand, Light Sand, Mud) is perfect for boots and lower leg armor.
  • The Tip: Use the "Soot" color from Set B on the muzzles of your E-WEB cannons or the exhaust ports of our industrial power generators.

Vallejo & Ammo by Mig

If you’re looking for a bit more grit, these brands offer loose pigments in jars. They are much more concentrated and can be applied dry for a dusty look or mixed with a "pigment fixer" to create thick, dried mud.

  • Best For: Creating heavy rust on greeblies or adding "desert crust" to the base of your Tusken Raider dioramas.

A highly detailed weathered Sandtrooper backpack showing heavy grime and desert dust effects.

2. Liquid Talent: Inks and Washes

There’s a joke in the hobby community that Citadel’s Nuln Oil is "liquid talent" in a bottle. Honestly? It’s not far from the truth.

Washes are very thin, translucent paints designed to flow into the deep cracks and crevices of your 3D-printed kits. As they dry, they create artificial shadows that make the fine details of our kitbash greeblie panels really pop.

  • Citadel Nuln Oil: This is your black wash. Use it for oily mechanical parts, vents, and deep shadows on blasters.
  • Citadel Agrax Earthshade: This is a brownish, "dirty" wash. It’s the secret sauce for making armor look like it’s been through the mud or for adding life to the fur textures on our Wyyyschokk or Kusak models.

The Technique: Don’t just slather it on. Apply it liberally, let it sit for a minute, and then use a clean, damp Q-tip to wipe it off the high surfaces. This leaves the "grime" only in the cracks, giving your prop instant depth.

3. The MacGyver Method: Household Hacks for the 'Used Universe'

You don’t always need to spend $20 on a tiny jar of specialized hobby paint. Some of the best weathering effects can be found right in your kitchen or closet. BTW, these are great if you're on a budget or just want to experiment with textures you can't get from a bottle.

Shoe Polish for Leather and Grime

Liquid shoe polish (the kind with the sponge applicator) is a fantastic, cheap alternative to hobby washes.

  • How to use it: Brown shoe polish is incredible for adding a "worn leather" look to pouches or belts. Black shoe polish can be used as a "sludge wash" over large armor pieces, just wipe it back quickly before it sets!

Cinnamon for Realistic Rust

This is one of our favorite tricks. If you need a textured, crunchy rust look on an old droid or a piece of scrap metal, reach for the spice rack.

  • The Hack: Paint the area with a dark brown or orange acrylic, and while it’s still wet, sprinkle on some ground cinnamon. Once it’s dry, it looks (and smells!) surprisingly like authentic, oxidized metal.

Real Sand and Dirt

Why buy "sand-colored pigment" when you can just use… sand?

  • The Hack: If you’re building a Tatooine-themed diorama, take a bit of real, fine sand, mix it with some matte Mod Podge or PVA glue, and dab it into the corners of your crates or the feet of your droids. It adds a physical texture that paint simply can't replicate.

Oil Paint 'Sludge' Washes

Grab a cheap set of oil paints from an art store (specifically Burnt Umber and Lamp Black).

  • The Hack: Mix a tiny pea-sized amount of oil paint with some odorless mineral spirits (thinner) to create a very runny soup. Slather this over your model. Because oil paints dry slowly, you have hours to wipe it away with a rag until you get the perfect level of "sludge." This is how the pros get those beautiful, streaky grime marks on Star Wars helmets.

Close-up of a Cassian head sculpt with realistic weathering and skin textures.

4. Bringing it All Together on Your 3D Prints

When you order a 3D-printed kit from us, whether it's in 1:6, 1:12, or 1:18 scale, the material matters. Most of our kits are high-quality resin, which is fantastic for holding these weathering layers.

Please review our assembly instructions before you start painting, but here is a quick "Used Universe" workflow we recommend:

  1. Prime it: Use a good matte primer (Grey or Black).
  2. Base Coat: Paint your main colors.
  3. The 'Wipe-Away' Wash: Use Nuln Oil or an Oil Sludge wash to define the details.
  4. Dry Brushing: Use a lighter version of your base color (or a silver for metal) on a nearly dry brush to catch the edges.
  5. Pigments/Powders: Add your dust, soot, or sand effects last.
  6. Seal it: Mist it with a matte clear coat to lock everything in.

We Want to See Your Creations!

Nothing makes us happier than seeing how you’ve brought our models to life. Did you use the cinnamon rust trick on our Steelpecker? Or maybe some shoe polish on your Tusken Raider accessories?

Chat to us in the community or tag us in your progress photos. We love seeing the creative ways you guys achieve that perfect, grimy Star Wars look.

And hey, if you want more tips (and some exclusive deals on our latest kits), make sure to join our VIP club. Just head over to our sign-up page: we promise not to spam your inbox, just pure hobby goodness!

Happy weathering, builders!

( The Redflare Team)

Read more

Some Mistakes You may be making with Star Wars Cosplay Armour (and How to Fix Them)

We’ve all been there. You spend months 3D printing, sanding, and painting your dream suit of armour. You finally strap it on, walk into your first convention, and realize… you can’t actually walk. Or your chest plate is slowly strangling you. Or, even worse, you look less like a battle-hardened Imperial Remnant and more like a guy in a plastic suit.

At Redflare Model Studio, we’re obsessed with the fine details. Whether we’re designing 1:6 scale collectibles or helping you plan your next full-scale build, we know that the difference between a "costume" and "character" is in the technical execution.

Today, we’re breaking down the seven most common mistakes we see in the Star Wars cosplay community and, more importantly, how you can fix them before your next troop.

1. The "Penguin Waddle" (Poor Strapping & Mobility)

The most iconic Star Wars mistake isn't a continuity error, it’s the restricted gait of a trooper whose strapping is too tight or poorly placed. If you can’t bend your knees or your thighs are slamming into your codpiece, you’ve got a strapping issue.

The Fix:
We recommend a hybrid strapping system. Don't rely solely on industrial Velcro; it will fail you the second you start to sweat. Instead, use a mix of 1-inch black nylon webbing and heavy-duty elastic. Use "hard points" (nylon straps with snaps or rivets) for the main weight-bearing areas like your shoulders and thighs. Save the elastic for the areas that need to expand when you move, like the back of your knees and your elbow joints.

Pro Tip: Check out our assembly instructions for a look at how we handle mechanical joints in our smaller scale models, the principles of mobility are the same!

2. Incorrect Gap Spacing Between Plates

Nothing screams "amateur build" faster than massive, uneven gaps between your armour plates. If there’s a four-inch gap between your chest and ab plate, the silhouette of the character is lost. Conversely, overlapping plates will chew through your paint job in minutes.

The Fix:
Aim for "kissing" distance. Your plates should sit close enough that the undersuit is barely visible, but they shouldn't actually touch. Use a mirror (or a very patient friend) to adjust your strapping while you’re in a neutral standing position. If you’re building a specific Legion-standard kit, always refer to the CRL (Costume Reference Library) for exact spacing requirements.

3. Ignoring the Undersuit Quality

Your undersuit isn't just a layer of clothing; it's the "black void" that makes the armour pop. Using a baggy cotton jumpsuit or a shiny spandex suit with visible zippers and logos will immediately break the immersion.

The Fix:
Invest in a high-quality, two-piece compression suit in a matte finish. Ribbed fabrics often look more "screen-accurate" and help provide a bit of friction to keep your armour from sliding around. Make sure your neck seal is high enough to tuck under your helmet, so no "neck-skin" is visible when you turn your head.

4. Over-Weathering (The "Junk Pile" Effect)

We love a bit of grit, but there’s a fine line between "battle-damaged" and "fell in a blender." Many builders overdo the silver "chipping" effect or smear black wash evenly over the entire suit, which just makes it look messy.

Detailed weathering on a Sandtrooper backpack showing realistic grime and wear patterns

The Fix:
Think about the story of your armour. Where would dirt actually collect? Usually, it's in the recessed "greeblie" areas, around the boots, and where plates rub together. Use our weathering guides to learn how to layer your paints. Start with a subtle grime wash in the crevices, then add "high-traffic" wear only on the edges that would actually bump into things.

BTW, if you’re looking for inspiration on how to weather technical gear, take a look at our weathered Sandtrooper accessories, we use those same layering techniques to achieve that dusty, Tatooine look.

5. Using the Wrong Plastic Finish

A common debate: should your Stormtrooper be as shiny as a new car or matte like a piece of military equipment? Using a high-gloss finish on a kit that should be satin (or vice versa) can make the material look like "cheap plastic."

Comparison between a high-gloss finish and a screen-accurate satin-matte finish on white armour plates

The Fix:
Check your references. Original Trilogy (OT) Stormtroopers are famously glossy, but modern "Remnant" troopers or Clones usually have a more industrial, satin-matte finish. Always use a dedicated clear coat (matte, satin, or gloss) to seal your paint. This doesn't just look better; it protects your hard work from the inevitable scuffs of a convention floor.

6. Neglecting the Backplates

We spend 90% of our time looking at the front of the suit in the mirror. But at a convention, people will be seeing your back just as much as your front. If your backplate is crooked, or your strapping is visible and messy, it ruins the "360-degree" illusion.

The Fix:
Use a "harness" style strapping system that pulls the backplate flush against your shoulder blades. If you're wearing a backpack (like a Sandtrooper or Heavy Mando), ensure the weight is distributed through the shoulder straps and anchored to your belt. This prevents the "sag" that often pulls the front of the chest plate upward.

7. Sharp Edges That Cut Into the Costume

This is a technical mistake that leads to physical pain. 3D printed or vacuum-formed plates often have razor-sharp edges or "burrs" from the manufacturing process. If you don't sand these down, they will slowly slice through your undersuit, scratch your skin, and even damage the paint on adjacent plates.

Macro shot of a hobbyist sanding the inner edges of an armour plate to ensure a smooth, comfortable fit

The Fix:
Every single edge of your armour should be "de-burred." Use a fine-grit sanding sponge (around 400-600 grit) to slightly round over the inner edges of your plates. This is especially important around the neck, armpits, and thighs. Please review all your pieces for sharp points before your final paint pass!

Ready to Level Up Your Kit?

Building a screen-accurate suit of armour is a marathon, not a sprint. It takes patience, a lot of sanding, and a community to back you up. If you're looking for those finishing touches: like screen-accurate head sculpts, weaponry, or diorama pieces to display your suit: be sure to browse our full collection.

Stormtrooper-themed product bundle including t-shirts, prints, and high-quality head sculpts

Got questions about a specific build? Chat to us or drop us a line! We love seeing what the community is working on. And if you want exclusive deals on our newest kits, don't forget to join our VIP club: we promise not to spam your inbox, just pure Star Wars goodness.

Happy building, and we'll see you on the rim!

Read more

Correcting Mistakes with Star Wars Cosplay Weapons

We’ve all been there. You spend months sewing the perfect flight suit, weathering your flak vest until it looks like it’s survived a Sarlacc pit, and then you reach for your trusty sidearm… and it looks like a piece of painted Tupperware.

At Redflare Model Studio, we’re obsessed with the details. Whether we’re crafting a 1:12 scale head sculpt or a massive E-WEB heavy repeating blaster, we know that the "Used Universe" aesthetic isn't just about throwing some silver paint at a plastic tube. It’s an art form.

If you want your props to look like they were pulled straight from the Lucasfilm archives, you need to avoid these seven common pitfalls. Grab your sandpaper and a cup of caf, let’s get to work.

1. The "Floaty" Blaster: Unrealistic Weight Distribution

One of the quickest ways to break the immersion of a great cosplay is the "floaty" prop. You know the one: a massive heavy rifle that the cosplayer accidentally flips around like it’s made of balsa wood.

The Mistake: Building a large prop entirely out of hollow 3D prints or lightweight foam without considering how it should feel. If you’re carrying a heavy blaster, your body should react to that weight.

The Fix: Even if you aren't actually lugging around 40 lbs of steel, you need to simulate the heft. When we design our larger kits, like the Heavy Plasma Cannon, we recommend adding internal weights. Lead fishing weights or even just filling hollow cavities with resin can give your prop a satisfying "thunk" when you set it down. It changes the way you carry it, making your "trooping" look far more authentic.

2. The Dreaded Seam Lines

We love 3D printing. It’s the backbone of modern prop making. But if we can see where your printer bed ended and the next part began, the magic is gone.

The Mistake: Assembling a multi-part kit and jumping straight to paint without addressing the join lines. Nothing screams "I made this in my garage" like a giant horizontal crack running through the middle of your barrel.

Split-screen comparison showing a raw 3D print with seam lines versus a smooth, primed surface

The Fix: Sanding is your best friend. Start with a coarse grit to level the surfaces, then use a high-quality filler, like Bondo Spot Putty or even a mix of resin and baby powder, to bridge the gaps. Once it’s smooth, hit it with a sandable filler primer. If you’re unsure how to prep your kit, check out our assembly instructions for some pro-tips on getting that seamless look.

3. Generic "Silver" Drybrushing

This is arguably the most common "rookie" mistake in the prop-building world. You finish your black base coat, grab a bottle of "Silver," and go to town on every edge.

The Mistake: Using a single, bright silver color for all your weathering. Real metal doesn't just turn bright silver when it’s scratched; it oxidizes, collects grime, and wears down in layers. Generic drybrushing often looks like tinsel rather than battle-worn durasteel.

Close-up of a weathered Sandtrooper backpack showing layered grime and realistic metal wear

The Fix: Layering is key. Start with a dark gunmetal base. Instead of just drybrushing, try "sponge chipping" with a dark grey first, then add tiny amounts of bright silver inside those dark spots to show deep scratches. Follow it up with a dark wash (black and burnt umber) to settle into the recesses. If you look at our Sandtrooper accessories, you’ll see that the "grime" is just as important as the "shine."

4. Flimsy Triggers and Handles

There is nothing more heartbreaking than being in the middle of a photo op and hearing a "snap."

The Mistake: Focusing so much on the aesthetics of the barrel and the scope that you forget the parts you actually touch. 3D printed triggers and thin handles are notorious for snapping under the pressure of a gloved hand.

The Fix: Reinforce your high-stress areas. We always suggest running a metal rod or a wooden dowel through the center of long blasters, like our Drum Blaster rifles. For triggers, consider casting the part in a more durable resin or using a small metal pin as a pivot point. If it feels flimsy on the workbench, it will break at the convention.

5. The "Dead Eye" Optic Lens

A scope is a focal point of any Star Wars weapon, from the DL-44 to the massive E-WEB cannons.

The Mistake: Leaving your scope lenses as solid, painted plastic. It looks flat, lifeless, and, to be blunt, cheap.

The Fix: Give your optics some depth. You can use clear resin, or even a simple piece of tinted acrylic cut to size. For a truly "pro" look, paint a small red or green "HUD" detail on the inside of the lens before sealing it. If you’re using a solid part, a few coats of high-gloss clear varnish can simulate the reflection of glass. It’s a small detail that makes a massive difference when the light hits it.

6. Ignoring Strap and Holster Integration

So, you’ve built a beautiful, screen-accurate rifle. Now, how are you going to carry it for eight hours at a comic-con?

The Mistake: Adding "D-rings" or strap mounts as an afterthought. Often, these are glued onto the surface and snap off the first time you put any tension on them.

The Fix: Build your attachment points into the structure of the weapon. If you’re using a strap, make sure the mounting points are anchored into the internal reinforcement (remember that dowel we mentioned?). Also, consider the holster. If your blaster has a weird greeblie sticking out the side, will it actually fit in your leather holster? Test your "rig" early in the build process to avoid a logistical nightmare later.

7. Scaling for the Actor (Size Matters!)

In the world of action figures, we talk about 1:6 vs 1:12 scale all the time. In cosplay, you are the scale.

The Mistake: Printing a file at "100% scale" without checking if it actually fits your body. A 6'5" Trooper holding a blaster scaled for a 5'8" actor looks like they’re carrying a toy.

A cosplayer holding a correctly scaled, imposing heavy blaster rifle

The Fix: Before you start a 100-hour print job, do a "cardboard mockup." Scale the file in your slicer, print a 2D side profile on paper, and hold it in your hand. Does it look imposing? Or does it look like a snack-sized version of a weapon? At Redflare, we’re huge fans of "Big Gun Energy", our E-WEB Cannon kits are designed to be substantial because nothing kills a villainous vibe faster than a tiny gun.

Final Thoughts: The "Used Universe" is a Journey

Building the perfect prop isn't about being perfect on the first try; it’s about the layers. It’s the sanding, the priming, the "oops I dropped it" that adds a real scratch, and the final matte clear coat that brings it all together.

We love seeing what the community creates. If you’re working on a custom build using our parts or just want to chat about the best way to weather a Ronto's backpack, drop us a line.

BTW, if you’re looking to upgrade your diorama to match your new high-end cosplay, our VIP club members get exclusive deals on all our new 3D printed kits. Join the squad and let’s build something incredible together!

Please review your local convention's weapon policies before bringing your realistic props to an event( safety first, troopers!)


Read more